A Borrowing Shelf Works When Its Labels Answer Real Questions
Borrowing shelf labels help neighbours identify what is available, find its return place and handle snags without turning a shared shelf into paperwork.
A neighbour stands at a borrowing shelf with a tin of pruning shears in hand. The sign says “Take what you need”, but not whether the shears may leave the hall or where they belong afterwards. Clear borrowing shelf labels answer those ordinary questions before anyone has to track down a volunteer.
The aim is not to catalogue every object. It is to help a first-time visitor choose and return an item, while keeping the system easy for volunteers to maintain.
What should a borrowing shelf label say?
Start with the decisions a borrower needs to make: is this the right item, may I borrow it, and where does it go when I am finished? A name alone answers only the first question, and sometimes not very well.
- Item name: Write “hand trowel” rather than “garden tool”. Use familiar words, not an internal nickname.
- Borrowing condition: Say whether the item can leave the building, is for use on site, or is available by asking someone.
- Return place: Name a shelf, hook or crate. “Put back here” stops being useful if the item moves.
- Return action: Give a specific cue, such as “brush off soil before returning”.
- Help route: Point to a current contact method or a place for questions, rather than relying on a volunteer’s name that may become out of date.
Put the essential wording where it can be read without lifting or turning the item. Details that matter less often can go on a nearby notice.
How can labels distinguish similar items?
Use a short identifying detail when objects look alike but serve different purposes. “Cable” could mean a charging lead, extension lead or strap; “USB-C charging lead” tells a borrower which one is meant. “Fabric scissors—use for cloth” separates them from general-purpose scissors.
Group objects by familiar activities, such as gardening, sewing or household repair, and give each item a clear home within its group. Colour can help with scanning, but it should not carry the meaning on its own. Written category names remain useful in poor light and to people who cannot distinguish the colours.
Label containers as well as loose parts. “Spare buttons” is clearer than “spares”; if a part belongs with a particular item, keep them together or state where the companion piece lives.
Where should return instructions go?
A shelf label identifies an item’s home; a tag on the object travels with it. Use both when an item is small or often borrowed. For a bulky object that stays in place, the shelf label may be enough.
Choose a named location that will survive a modest rearrangement. “Red tool rail, garden section” is more useful than “second hook from the left”. If there is a tray for items needing attention, label it plainly and say what belongs there.
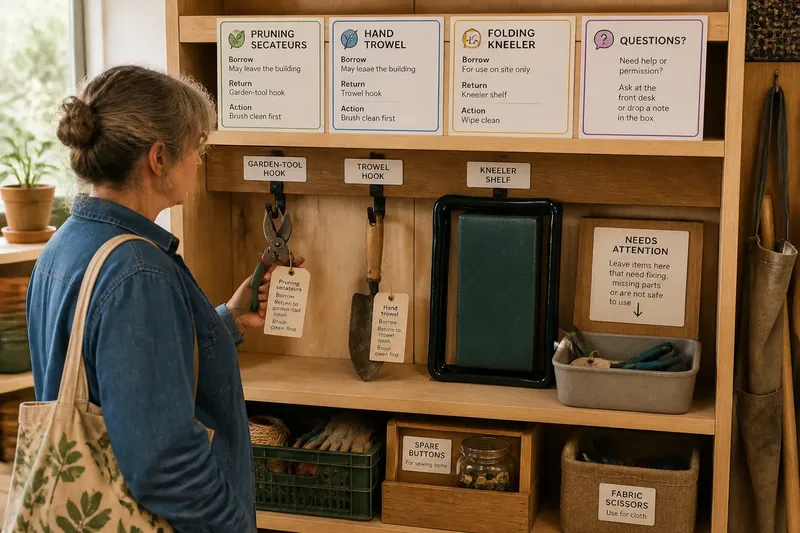
Say a shared hall has a pair of secateurs, a hand trowel and a folding kneeler. The volunteer writes “Pruning secateurs—borrow; return to garden-tool hook; brush clean first” on a tag, then gives the trowel and kneeler their own named hooks. A nearby tray reads “Needs attention—leave here”. A new borrower can identify each item, return it without guessing and set aside anything that needs attention rather than putting it straight back on the shelf.
Which information belongs on the shelf?
Include rules that change a borrower’s immediate choice. If an item must stay in the building, say so beside it. If permission is needed, state where to ask. “Use responsibly” is less helpful than a clear action.
A sturdy, self-explanatory object may need only a name and a return place. Longer instructions can sit in a small folder or on a nearby notice, as long as the label tells people where to find them. Keep any maker’s guidance or local requirement relevant to that particular item; broad warnings add clutter without helping someone choose a return place.
It is not worth adding a borrowing form, serial number or elaborate colour code to every ordinary object just to make the shelf look orderly. If a record is genuinely needed, make it proportionate to the item and the volunteers who maintain it.
What should you check before putting labels up?
For each item, compare its label with what a borrower can see and do. If a check exposes a problem, choose the alternative action rather than leaving an ambiguous instruction in place.
- Item name: Check that the wording identifies the object without relying on a nickname. If two items could share that name, add a distinguishing detail; otherwise, keep the plain name.
- Borrowing condition: Check whether the item may leave the site or must stay there. If the condition is restricted, write it beside the item; if it is unrestricted, do not add an unnecessary warning.
- Return location: Check that the named hook, shelf or crate exists and is marked. If it is not obvious, mark the location or choose a more stable one.
- Return action: Check whether cleaning or another simple action is needed before return. If so, state that action; if not, leave the label uncluttered.
- Help route: Check that the stated contact method or question point is still available. If it is not, replace it with a current route; otherwise, leave it as written.
- Label placement: Check that the wording can be read where the borrowing decision is made. If the item hides it, move the tag or add a shelf label; if it is already clear, do not duplicate it.
- Needs-attention route: Check whether borrowers can tell where to leave an item that needs attention. If no route exists, mark a tray or question point; if a clear route already exists, name it on the label only where useful.
What questions come up about borrowing shelf labels?
Does every item need its own label?
Label items separately if they are easy to confuse, have different return places or need different handling. Identical items with the same instructions can share a clearly marked container or shelf label.
How much text should a label contain?
Put the name, borrowing condition and return cue first, then add only details that change what a borrower should do. Move longer explanations to a nearby notice if they make an ordinary item hard to identify.
What if an item’s return place changes?
Update the shelf label and any tag that travels with the item, then remove the old wording. Card in a clip or a wipe-clean tag makes replacement straightforward; writing over an old instruction usually makes both versions harder to read.
Where should someone leave a damaged item?
Name one visible route, such as a marked tray, and say that it is for items needing attention. If an item may be unsafe to use, mark it unavailable and refer it to a suitable responsible person rather than returning it to the borrowing shelf.
How do labels stay accurate?
When someone already tends the shelf, include a quick comparison in that routine: do the contents match their names, are the return places still clear, and have any tags fallen off? If something has moved, update the label rather than asking visitors to remember the latest arrangement.
Borrowing shelf labels work when a visitor can identify an item, find its home and see what to do if it needs attention. The most useful edit is often a short phrase at the point of uncertainty: “use on site”, “return to blue crate” or “leave here if damaged”. Make those instructions visible before the next borrower reaches for the shears.